Features
Here is extra syntax you can use in your python script to get Loge report
Comments
Multi line comment
(indentation not acceptable)
#!
'''
Your miltiline Markdown comment

you can write long text
'''
Variable with line comment
(indentation acceptable)
a = 30 #! Comment
or if a value defined use
a #! Comment
Calling variable value in Loge comment
You can call variable value in comments using %(name)s as it show below
a = 1
b = 2
#! Values are %(a)s and %(b)s
or you can use val_name and var_name
a = 1
b = 2
#! Values are val_a and val_b
#! Variables are var_a and var_b
Python code
(indentation not acceptable)
Showing python code used in your script
You can show multi-line python code from your *.py script as it show below
#%code
text = 'Python is cool'
for i in text:
    print i
#%
or short syntax for one line code
text = 'Python is cool' #%code
Images from file
(indentation acceptable)
Showing image in report
You can show any image file from directory where your *.py script is stored. Most image file format allowed (including SVG).
#%img image.jpg
Showing dxf file
You can also show graphic from dxf file. Python dxf2svg package converter is used to display dxf.
More about dxf2svg at https://bitbucket.org/lukaszlaba/dxf2svg
#%img drawing.dxf [framename] [500]
The integer number is image size you will get in report.
Embedding image from clipboard
The code editor toolbar include feature that allow embed image directly from clipboard. It transform clipboard data into image file and is save in the same location where the loge script is located. After image file is saved #%img commend is added to script.
Image from PIL / PILLOW
(indentation acceptable)
Displaying PIL.Image instance in report
You can display image from PIL.Image instance using #%pil syntax.
from PIL import Image
imagefilepath = '/home/.../someimage.jpg' #<<<< Image path -
im = Image.open(imagefilepath) #%pil
im2 = im.resize((200,200)) #%pil
im3 = im.rotate(10) #%pil
im #%pil
Matplotlib
(indentation acceptable)
Showing Matplotlib figure
You can add to Loge report Matplotlib figure - matplotlib.pyplot instance is needed
import matplotlib.pyplot as plt
import numpy as np
t = np.arange(-1.0, 2.0, 0.01)
s1 = np.cos(9*np.pi*t) + 3 * t ** 2
plt.plot(t, s1)#%plt
plt.clf()
or you can use:
plt #%plt
Anastruct
(indentation acceptable)
Showing Anastruct figure
Anastruct is a python package that allow analyse 2D frames and trusses. It determine the bending moments, shear forces, axial forces and displacements. You can add Anastruct figures to Loge report. Anastruct figures base on Matplotlib.
More about anastruct https://anastruct.readthedocs.io/ and https://github.com/ritchie46/anaStruct
from anastruct import SystemElements
ss = SystemElements()
import matplotlib.pyplot as plt
ss.add_element(location=[[0, 0], [3, 4]])
ss.add_element(location=[[3, 4], [8, 4]])
ss.add_support_hinged(node_id=1)
ss.add_support_fixed(node_id=3)
ss.q_load(element_id=2, q=-10)
ss.solve()

fig = ss.show_shear_force(show=False)
plt #%plt
plt.clf()
Tabulate table
(indentation acceptable)
Showing Tabulate table
More about tabulate at https://github.com/astanin/python-tabulate
from tabulate import tabulate
table = [["spam",42],["eggs",451],["bacon",0]]
headers = ["item", "qty"]
tabulate_tab = tabulate(table, headers, tablefmt="fancy_grid") #%tab
or you can use:
tabulate_tab #%tab
LaTex
(indentation acceptable)
Rendering LaTex syntax from comment
#%tex s(t) = \mathcal{A}\mathrm{sin}(2 \omega t)
you can call variables
a = 23
#%tex f(x) = %(a)s * y
Rendering python code as LaTex syntax
pi = 3.14 #! - pi value
r = 40 #! - circle radius
# from formula
Area = pi * r ** 2 #%tex
Area #! - what we get
Rendering LaTex syntax from python string
LaTexString = '\lim_{x \to \infty} \exp(-x) = 0'
LaTexString #%stringtex
SVG graphic
(indentation acceptable)
Rendering SVG syntax from python string
svgsyntaxstring='''
<svg>
    <circle cx="30" cy="30" r="20" fill="tan" />
</svg>
'''
svgsyntaxstring #%svg
Rendering SVG svgwrite.drawing instance from svgwrite package
More about svgwrite at https://svgwrite.readthedocs.io
import svgwrite
svg_document = svgwrite.Drawing()
svg_document.add(svg_document.rect(size = (40, 40), fill = "tan"))
svg_document #%svg
Raport interaction
(indentation acceptable)
Interactive python variable changing
a = 120 #! - this is not interactive variable in your report
b = 30 #<< - this is interactive variable in your report click it to change it
#! the values are %(a)s and %(b)s
You can get other display effect using #<<, #<<< or #<<<<
b = 30 #<< your comment
b = 30 #<<< your comment
b = 30 #<<<< your comment
Special cases
- If your variable value is True or False then interactive CheckBox will be displayed on report when
#<<<or#<<<<used. When you click CheckBox the value will change to opposite bool value.
dosomething = True #<<<< Do something
if dosomething:
    a = 1
    b = 3
    c = a + b #%requ
    #! Done ...
- If you variable name has ‘filepath’ or ‘dirpath’ in it name then file or directory browse dialog will be open after clicked.
image_filepath = '/home/image.ipg' #<<<< Image file path to open -
image_filepath #! - this is your path

search_dirpath = '/home' #<<<< Directory to scan for data -
search_dirpath #! - your is your path
Interactive python variable selecting from list
If your variable is equal some list element
list = [1, 2, 3, 4]
variable = list[1]
You can make this choice interactive
list = [1, 2, 3, 4]
variable = list[1] #<< - select variable value
You can use #<<, #<<< or #<<<< to get different display effect
list = [1, 2, 3, 4]
variable = list[1] #<< - select variable value
variable = list[1] #<<< - select variable value
variable = list[1] #<<<< - select variable value
Examples of use
Example 1
car_list = ['volvo', 'toyota', 'saab', 'fiat']
your_car = car_list[1] #<<< - select your car
#! Your car is %(your_car)s .
Example 2
material_list = ['steel', 'concrete', 'plastic', 'wood']
material = material_list[1] #<<<< Material is -
#! The %(material)s will be used to make something.
Example 3
temperature_range = range(10,30,1)
room_temperature = temperature_range[2] #<<<< Select the room temperature -
#! Temperature %(room_temperature)s Celsius degree selected.
Mathematical expressions and equations
(indentation acceptable)
You can add to Loge report expressions and equations with optional comment using #%requ or #%equ (first give result value, second not)
a = 1
b = 3
c = 3*a + 4*b #%requ - your comment
c = 3*a + 4*b #%requ
c = 3*a + 4*b #%equ - your comment
c = 3*a + 4*b #%equ
3*a + 4*b #%requ - your comment
3*a + 4*b #%requ
3*a + 4*b #%equ - your comment
3*a + 4*b #%equ
Python code is format to look more natural
- when you working with math package the
math.prefix be deleted - python power sign
**is change to^
import math
math.pi #%equ
math.sin(1) #%equ
2**2 #%equ
When you working with SI units using Unum package
u.mchange to[m]e.t.c(mathexpression).asUnit()change tomathexpression
from unum import units as u
5 * u.m + 10 * u.mm #%requ
(5 * u.m + 10 * u.mm).asUnit(u.km) #%requ
Loge timer
You can run timer option to run your script regularly every specifed time space. This option is available from Timer toolbar (time unit in those toolbar is second). Here is a script that show current time on report - try use timer for it.
import time
timestring = time.strftime("%Y-%m-%d %H:%M:%S", time.gmtime())
#! ##The time is val_timestring
If you want to make timer on when script is open specify timer parameter in script:
import time
timestring = time.strftime("%Y-%m-%d %H:%M:%S", time.gmtime())
#! ##The time is val_timestring
#%timer 300 ON
Specified time is 300 millisecond and timer will be ON.
If you want set timer but not make it ON after opening the script:
import time
timestring = time.strftime("%Y-%m-%d %H:%M:%S", time.gmtime())
#! ##The time is val_timestring
#%timer 300 OFF
Saveas with dependences
If you use saveas option Loge will save copy of your python script and other files if those names are linked inside script code(for example images you has linked with #%img).
Code editor Greek letters usage
You can simply paste the needed unicode characters into your code. For Greek letters there is a build in feature included. To write Greek letter, write its roman equivalent and when the cursor is after the letter use Ctrl+G shortcut. Here is the list of available Greek letters.
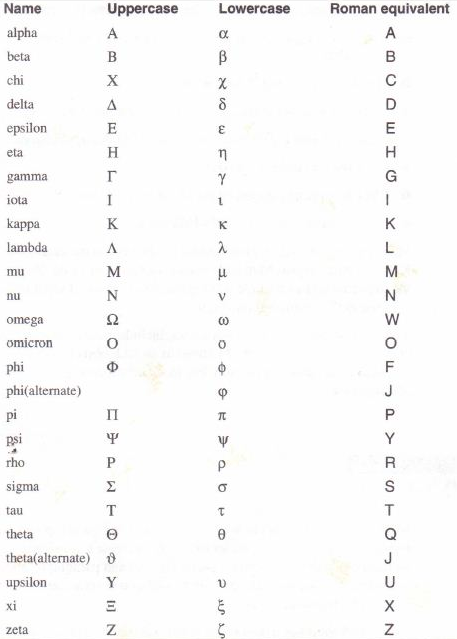 alt text